Preparing for the EU E-Invoicing Mandate: Step-by-Step Setup in Microsoft Dynamics 365 Business Central
Yuliia Ilchenko, Business Analyst, Xpand
Introduction
Have you heard about the EU (European Union) directive on e-invoicing? What does it mean for your business, and how can you prepare to comply with this significant legislation?
Since the implementation of the e-Invoicing Directive 2014/55/EU in April 2020, all public contracting authorities and contracting entities across the EU are now required to adapt their invoicing processes to meet new digital standards. With the clock ticking, e-invoicing is gradually becoming mandatory across various European countries, such as Spain by 2025 and Belgium by 2026. Understanding what it means and preparing for the implementation is essential. And penalties? No need to stress, I will guide you through the process.
In this article, we’ll discuss e-invoicing, its benefits, how Microsoft Dynamics 365 Business Central supports these requirements, and what you need to do to prepare your business for the upcoming e-invoicing mandate.
What`s e-invoicing?
E-invoicing, or electronic invoicing, refers to the exchange of an electronic invoice document between a supplier and a buyer. Unlike PDF invoices, which are simply digital representations of paper documents, an electronic invoice (e-invoice) is issued, transmitted, and received in a structured data format. When discussing XML structures, these invoices can conform to various frameworks such as Peppol (Pan-European Public Procurement On-Line), UBL (Universal Business Language), Facturae, and others. Depending on the regulations of each country, different conditions and structures must be followed.
Now let`s talk about the benefits adoption of e-invoicing:
- Structured, machine-readable format enables efficient processing and archiving of invoices.
- Automation removes the need for manual data entry, minimizing errors and improving accuracy.
- Reduced costs with no need for printing, postage, or physical storage.
- Streamlined operations lead to faster processing times, helping businesses get paid more quickly.
- Greater efficiency and cost-effectiveness through improved error detection and cost reduction.
And there’s even more to gain, these are just some of the many advantages e-invoicing can bring to your business.
With the fundamentals of e-invoicing covered, let’s explore the e-invoicing process in detail and review the different models below.
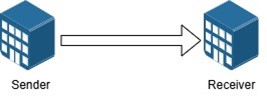
To start, we have the Sender and Receiver. In the simplest setup, the two-corner model, the sender transmits the e-invoice directly to the receiver. While this straightforward model is already used by some businesses, it does not fulfill the requirements outlined in the EU directive.
Moving to
the next format, the three-corner model, the process becomes a bit more
complex with the addition of a Service Provider. In this setup, we no longer
need to communicate directly with the receiver in their correct format.
Instead, we communicate with the Service Provider, who ensures proper formatting.
While this model may be suitable in certain countries, there are often cases
where customers or vendors have different Service Providers, which leads us to
the next model.
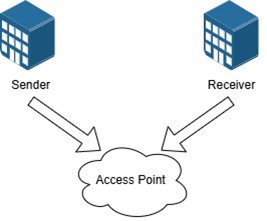
The four-corner model introduces both a Sender Access Point and a Receiver Access Point. In this setup, the sender and receiver communicate exclusively with their Access Points, which then handle the communication between each other. When the sender transmits an electronic invoice to their Sender Access Point, it forwards the invoice to the Receiver Access Point, which then delivers it to the receiver. Additionally, these Access Points also exchange this information with government entities.
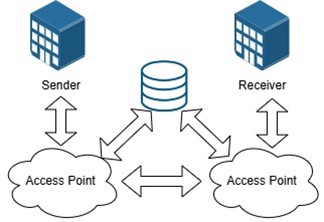
If we check out the four-corner model further, electronic invoicing is not only about sending and receiving invoices, but as well the additional messaging system. This means that our ERP system must include a built-in e-invoicing module to manage this communication. Let’s refer to the diagram below: imagine we are the sender using Business Central (BC) and its messaging system, while on the right side, we have the receiver’s ERP system with its own messaging system (our customer).
The initial communication occurs when we (the sender) send the electronic document to our Access Point, where the first validation takes place. We then receive confirmation from the Access Point whether the document is correct or not. After this, the Access Points communicate with each other. When the Receiver Access Point delivers the invoice, the customer can approve, reject or provide other responses to the document. This message must then be sent back to Business Central through the Access Points, demonstrating bidirectional communication in this four-corner model.
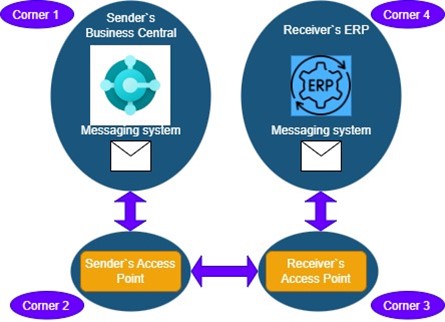
When considering the implementation of e-invoicing in your business, two key questions should be addressed (representing the two corners involved):
- Which Access Point should be selected, and what criteria should guide this choice?
- How can Business Central be configured to work with e-invoicing?
When choosing an Access Point, it is essential to ensure that it is certified and accredited to guarantee proper communication with other Access Points and government systems. These Access Points should support the required XML formats specific to your country.
Depending on your version of Business Central, you may need to explore the built-in solutions offered by the Access Point to fulfill the required e-invoicing module in your ERP system (covering Corner 1 in the diagram above). This is especially relevant since the additional E-Documents Core module was implemented in the Business Central 2023 Release Wave 2.
Additionally, various Service Providers may offer additional features that could enhance your e-invoicing process. If you need assistance in selecting the right service for your business needs, feel free to contact Xpand for expert guidance.
Now let’s explore how Microsoft has equipped Business Central 2023 Release Wave 2 to meet the new e-invoicing requirements. The high-level architecture begins with the W1 Base app, which already included some features related to e-invoicing and being used by some businesses. However, the key enhancements have been delivered through an additional extension: the E-Documents app. This is a global extension for all countries, and on top of this, there are also specific localizations that offer additional functionality to meet country-specific needs. Partners have a possibility to extend not only core apps, but localization apps as well adding some improvements due to industry specifics. Access Points Providers can also extend the features and provide an additional value.
Are you keeping up with what’s new in the latest Business Central release? If you missed the key highlights from the 2024 Release Wave 2, we invite you to check out our material on the topic: What’s New in Dynamics 365 Business Central 2024 Release Wave 2.
This high-level architecture demonstrates that the E-Documents functionality not only includes the most important features but also allows us to add additional value, making it quite flexible with no limitations.
To begin building your E-Documents application using standard functionality in Business Central, follow these steps:
1. Select and Integrate with an Access Point
After choosing your Access Point, establish integration with it through the E-Documents Services Setup in Business Central. Currently, Microsoft provides only one pre-integrated Access Point Pagero. However, there are no contractual obligations within Business Central, so you’ll need to contact Pagero directly to set up a contract. If you choose a different Access Point, that provider would need to add their own connectors on top of the E-Documents core framework.
2. Configure E-Documents Services Setup
In E-Documents Services Setup, beyond setting up the Access Point connection, you configure your system’s entire behavior for e-document communication. This includes setting Imported Parameters such as Lookup Item Reference or Item GTIN, Validate Line Discount, and other options for importing electronic invoices, along with Document Types.
- You can configure the Data Exchange Definition format in your localization settings, adding a line for each document type you need. There are prepared data exchange definitions for the PEPPOL format that are related to the standard sales and purchase document. However, it’s likely that these definitions will need adjustments to fit your specific requirements, so be sure to test and modify them as needed before fully implementing them.
- If you don't use the Data Exchange Definition formats, you can create and configure formats. Adjust settings on the Export Mapping and Import Mapping lines to define the tables and fields for transformation rules. Additionally, you’ll need to add a new option in the Document Format field that corresponds to your format.
3. Set Up Workflows
After establishing your connection with the service provider, the next step is to set up the Workflow. There are two ready-made templates—Send to One Service and Send to Multiple Services—which can be used when creating a new workflow. Alternatively, you can create your own workflow for e-documents without using predefined workflow templates. In the response field you select your set up E-document service. If you have more services, you can set different workflows.
4. Set Up Document Sending Profiles
Once you have prepared the workflows, assign them to your customers using Document Sending Profiles. This setup allows you to define each customer's preferred method of receiving invoices, helping to automate your electronic invoicing process. You can create multiple Document Sending Profiles corresponding to different workflows and then assign these profiles to customers by selecting the appropriate Document Sending Profile on each customer’s card.
5. Set Up Master Data
The next step is to set up your master data. This involves mapping fields according to the requirements of your Access Point, for example, customers' and vendors' VAT or GLN numbers, item cross-references, and more.
6. Set Up Retention Policy, Dashboard, and Background Jobs
E-documents may be subject to various local regulations regarding the required retention period. Therefore, you can find the Retention Policy setups on the E-Document Services page. Additionally, create a Dashboard to help users track e-invoicing processes and set up Background Jobs to automate processes related to e-document management.
Conclusion
With e-invoicing becoming the new standard across the EU, it’s essential to configure your Business Central environment thoughtfully — integrating with the right Access Point, setting up accurate master data, establishing seamless workflows, and ensuring flexible mapping.
If you're ready to get started or need expert guidance to implement the e-invoicing process for your business, why not entrust it to professionals with years of experience? Reach out to Xpand for support by contacting us through the link provided: https://www.xpandsoftware.com/page/contact-us.
About Xpand
Xpand is a product and service company offering full-cycle services from implementation to customer support for Microsoft Dynamics 365 Business Central, Dynamics 365 products, as well as for our product, Xpand Portal, which integrates with Business Central and provides customizable, 24/7 access to information for clients globally.

