What's New in Xpand Portal 3.3.0.0
A new theme with brand new UI (US3281)
In this release of Xpand Portal, we are proud to introduce a new preconfigured theme with brand new UI for the front end. The UI in this theme has been completely overhauled and provides a new look and feel of Xpand Portal. Once the new theme is configured in the back end, you can select it in the Themes setting of your localization page.
The new theme with the new UI is available in two color variants: blue and gray.
All portal pages (grid, detail page, calendar, etc.) and page elements (tabs, dropdowns, charts, gauges, tiles, etc.) have a new look.
Here are a few examples of the new UI:
- New grid page (gray theme)

- New grid page (blue theme)
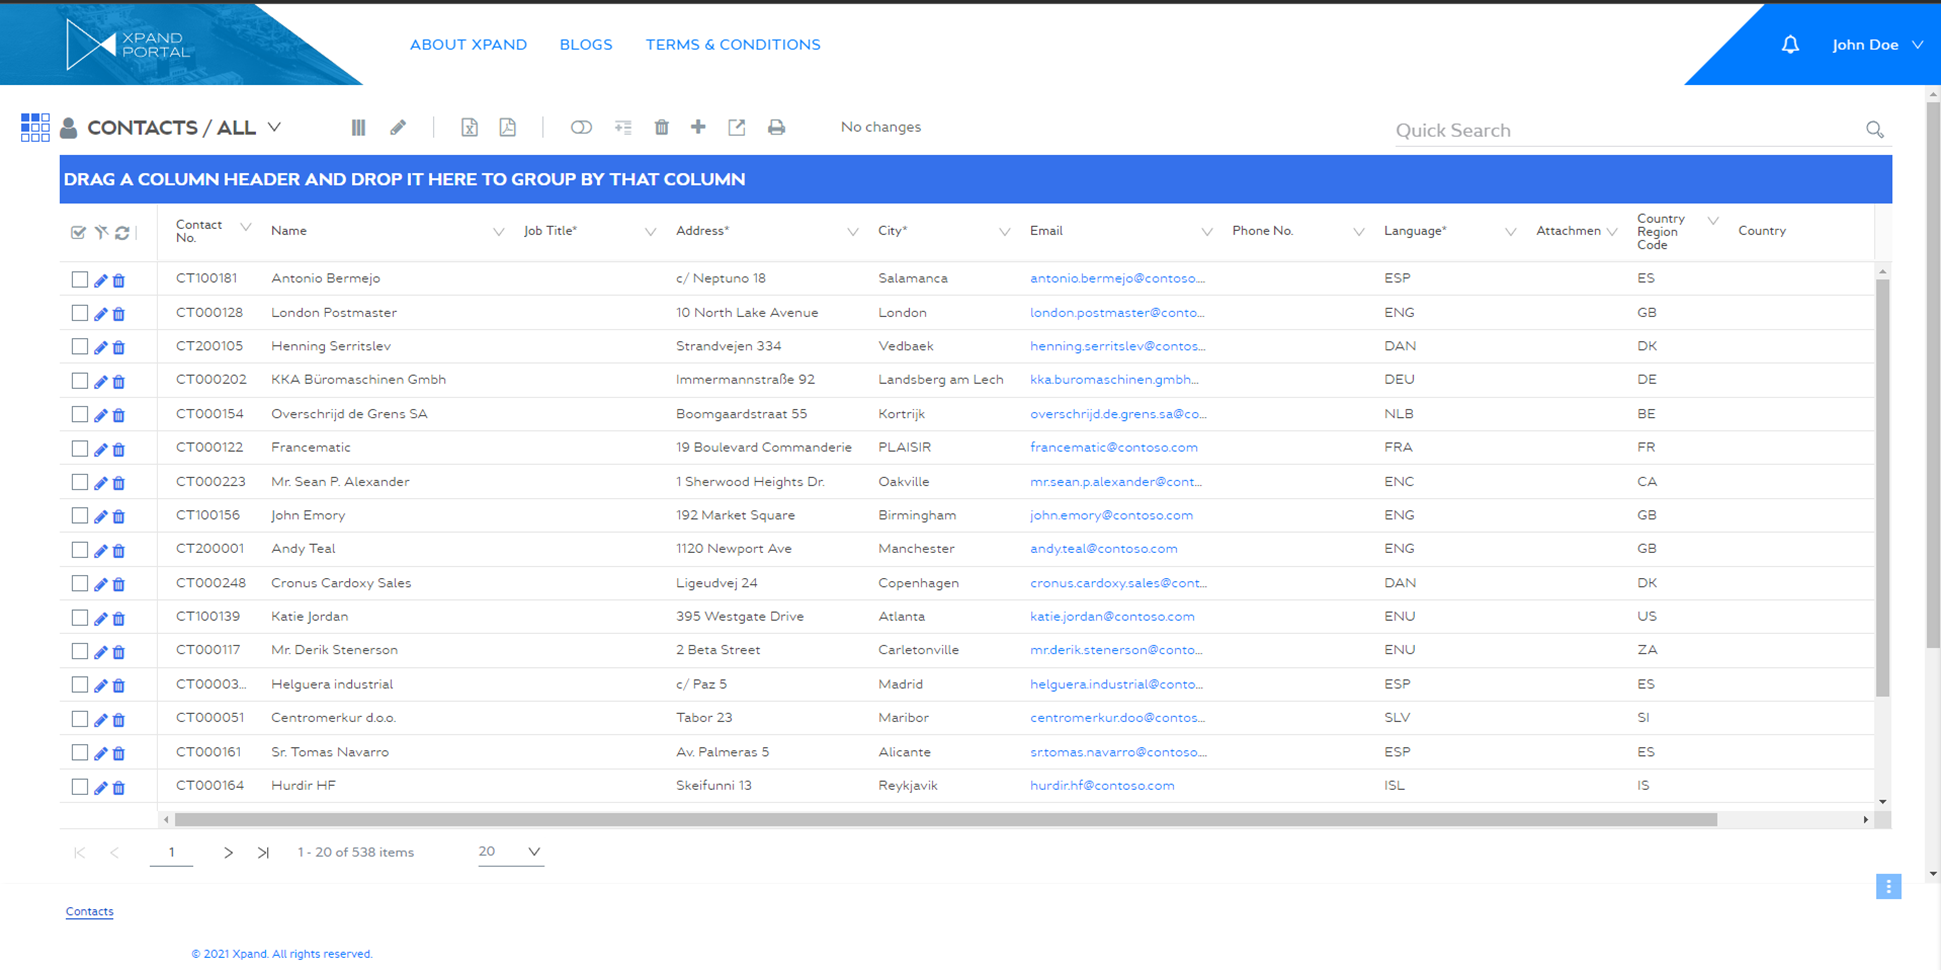
- New charts

- New gauges
- New tiles
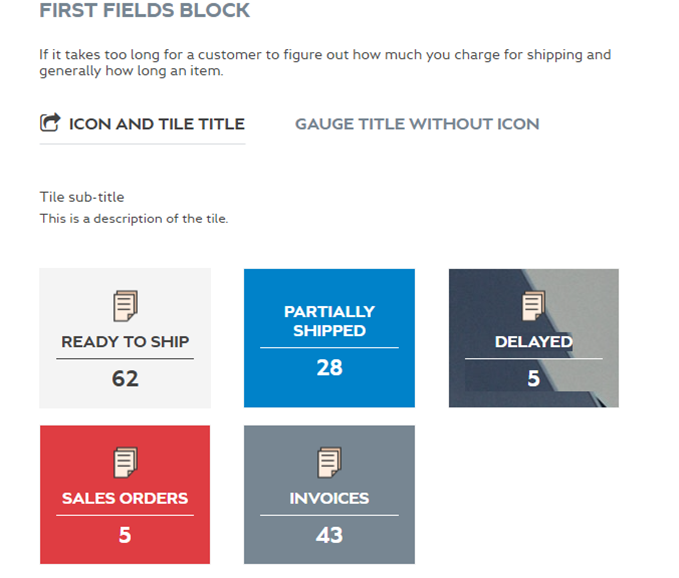
- New Calendar page
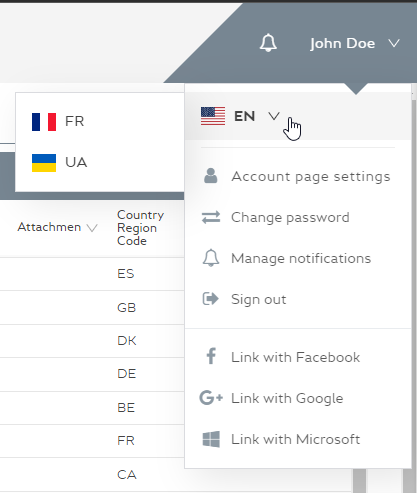
- New language selection menu (US4589) - As part of the new UI, the language selection menu was redesigned. Now it is within the member menu, showing the currently selected language. Selecting the language opens a drop-down menu where you can select a different language if available.
- New toolbar commands look and quick search bar (T4572) – The toolbar commands bar was redesigned and is now on the same level with the quick search bar.

New service column menu (US4574)
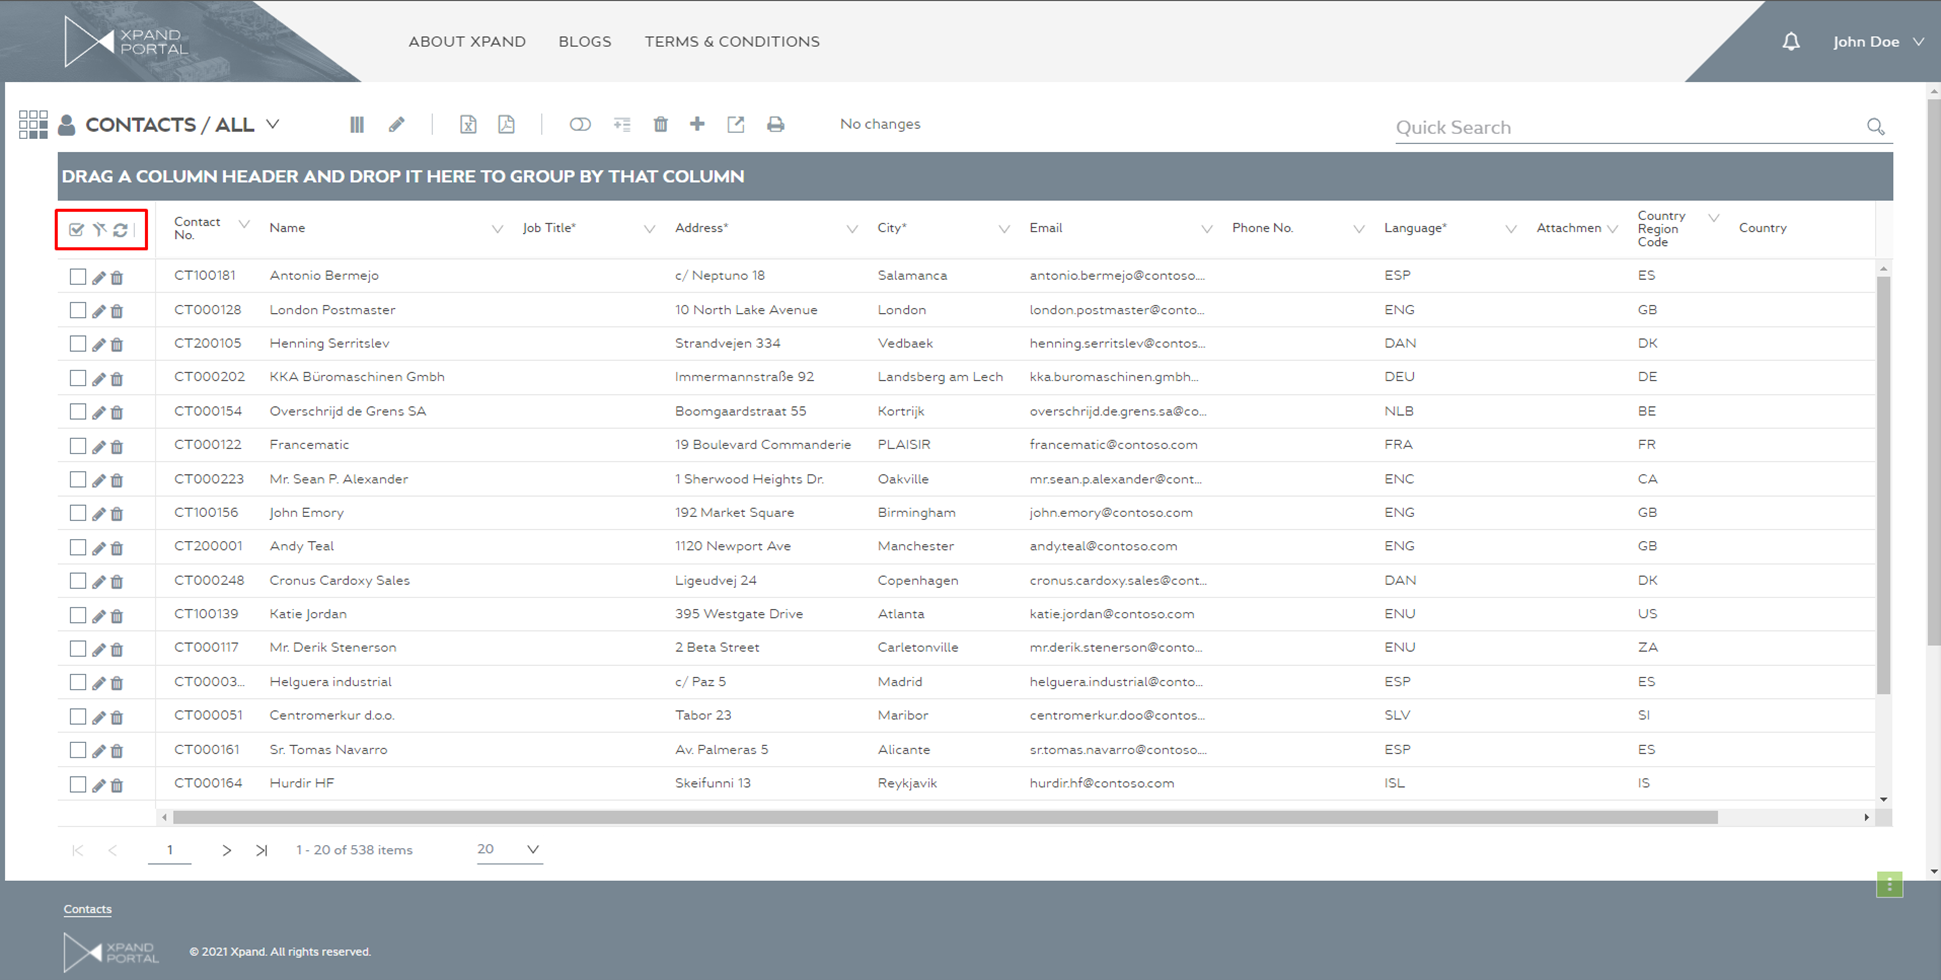
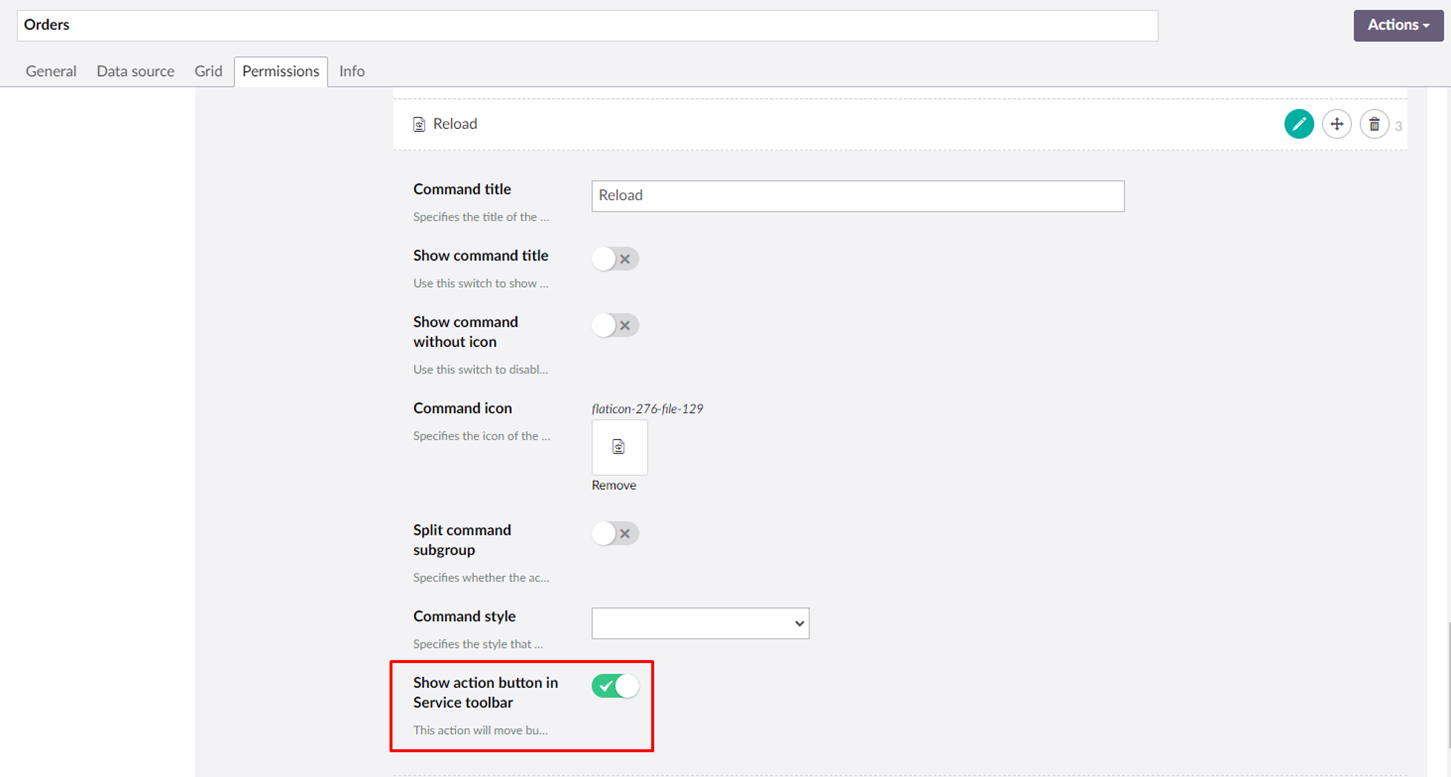
A new service menu is added in the top left corner of the Grid page. This menu is intended to increase Xpand Portal's usability when you need to perform actions with data on the grid. It can have up to 6 actions: Select, Refresh, Filter, Edit inline, Column Visibility and Scheduler. These actions are enabled from the back end via a new switcher Show action button in Service toolbar, which moves the corresponding action from the command toolbar menu to this new service menu.
| Note: Select and Scheduler actions appear on the command toolbar with switchers Select All and Enabled correspondingly and move to the service toolbar when the new switcher Show action button in Service toolbar is ON. |
New setting for uploading a footer logo (T4202)
Now it is possible to upload a footer logo for your
localization.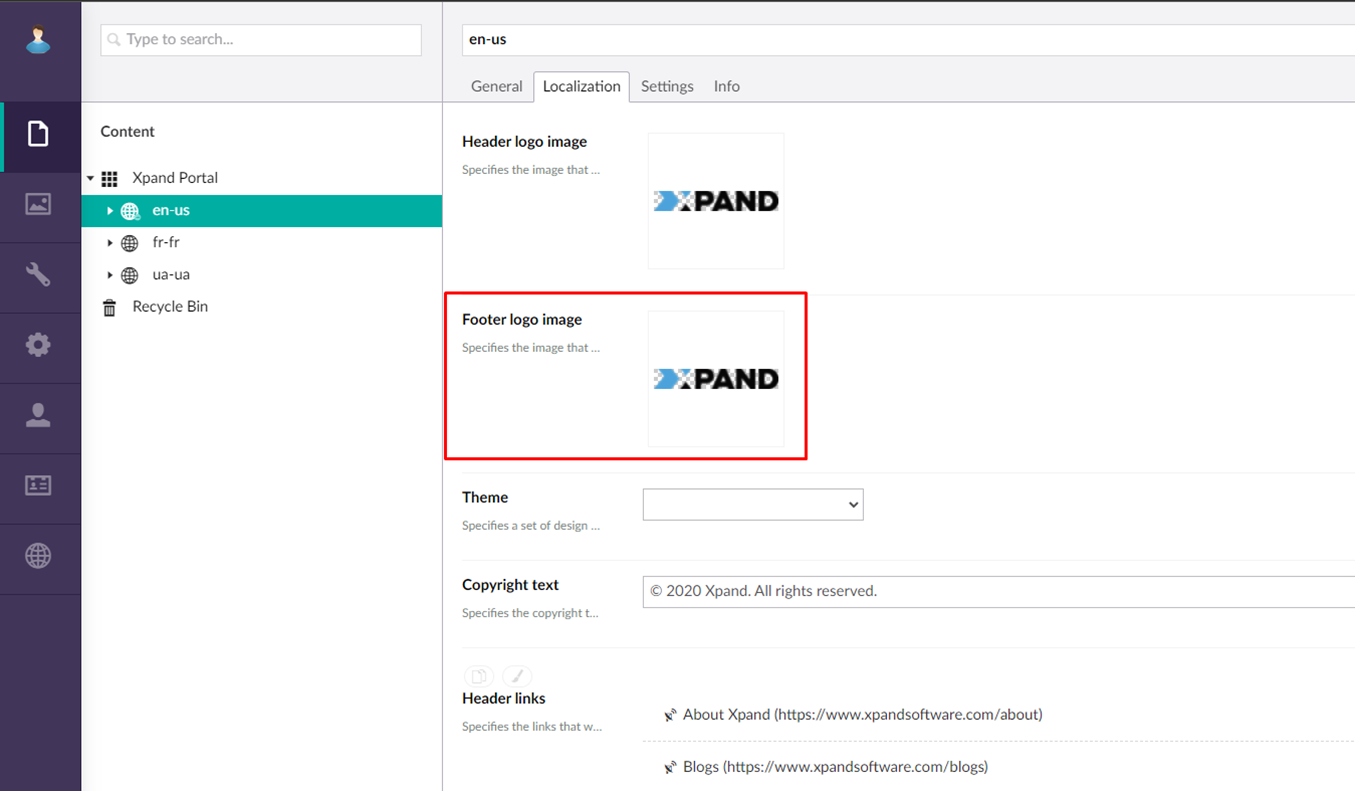

New settings for the navigation pane (US3281)
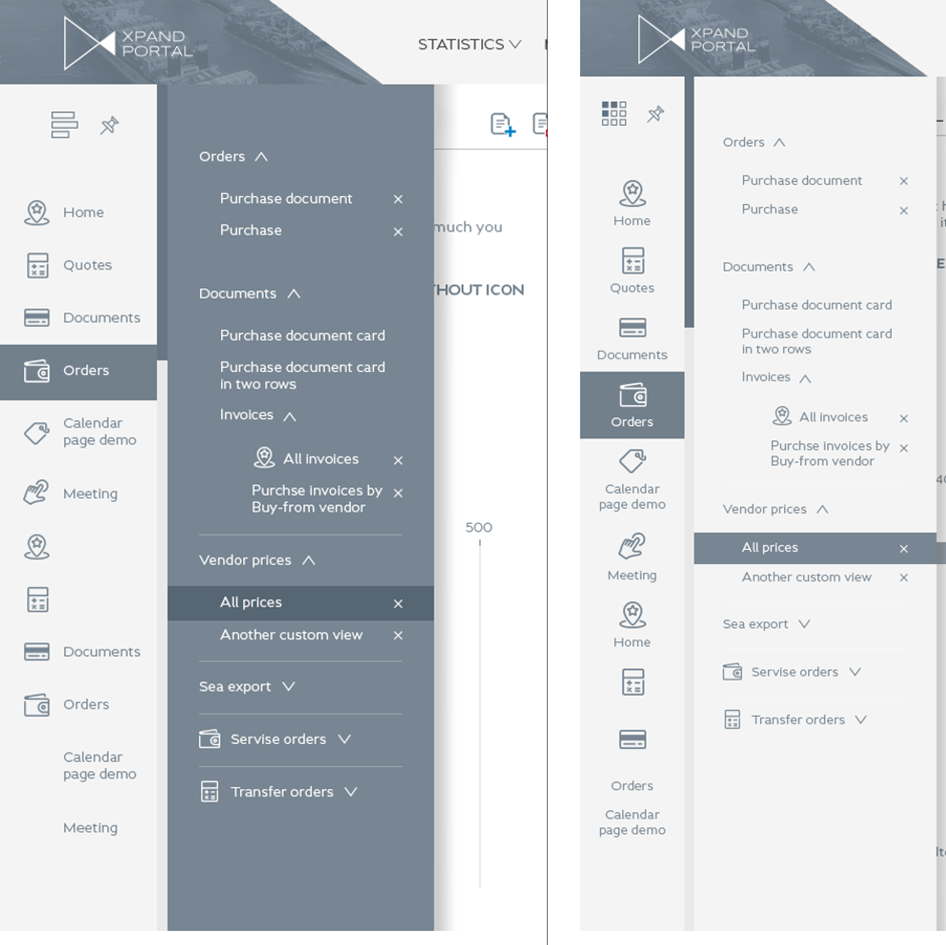
Now it is possible to choose the look of the new navigation
pane using the new Menu view setting as part of the theme customization.
There are several predefined types of the navigation pane to choose from.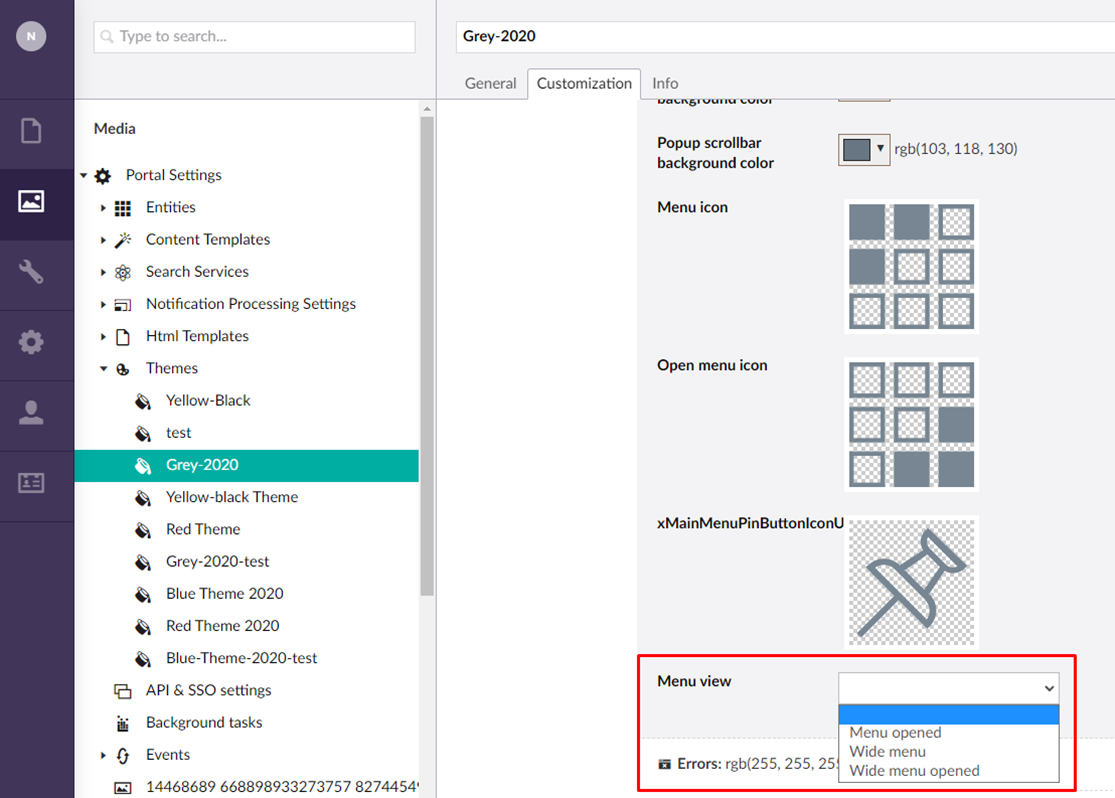
New toolbar commands – Complex modify and Complex delete (US4386)
New commands are available on the grid and detail toolbar actions setup:
Complex modify allows changing the parent record
together with related child records on the basis of configured validation
filters, without navigating to the needed pages.
Complex modify command setup:

Front end look:
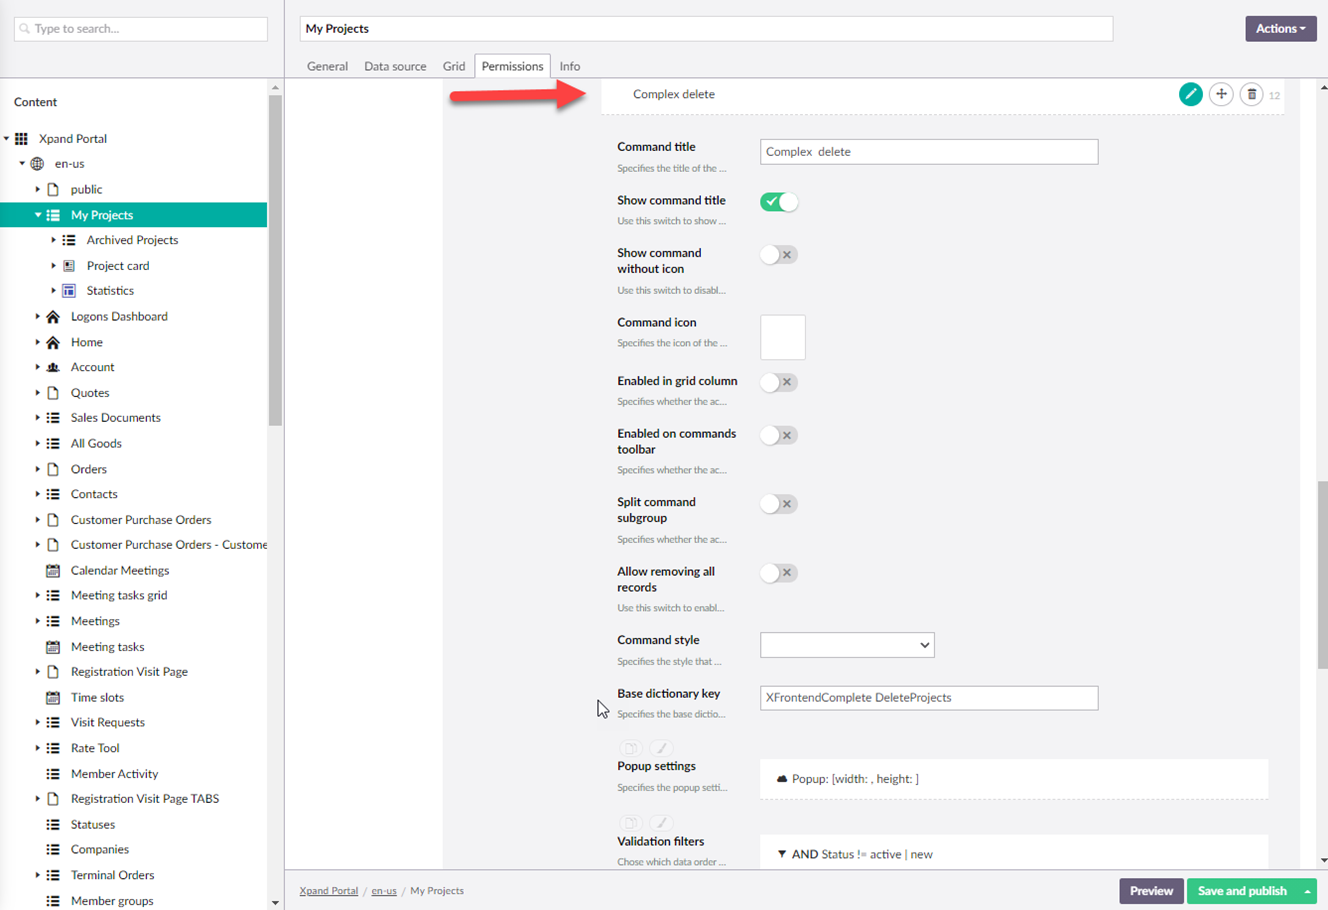
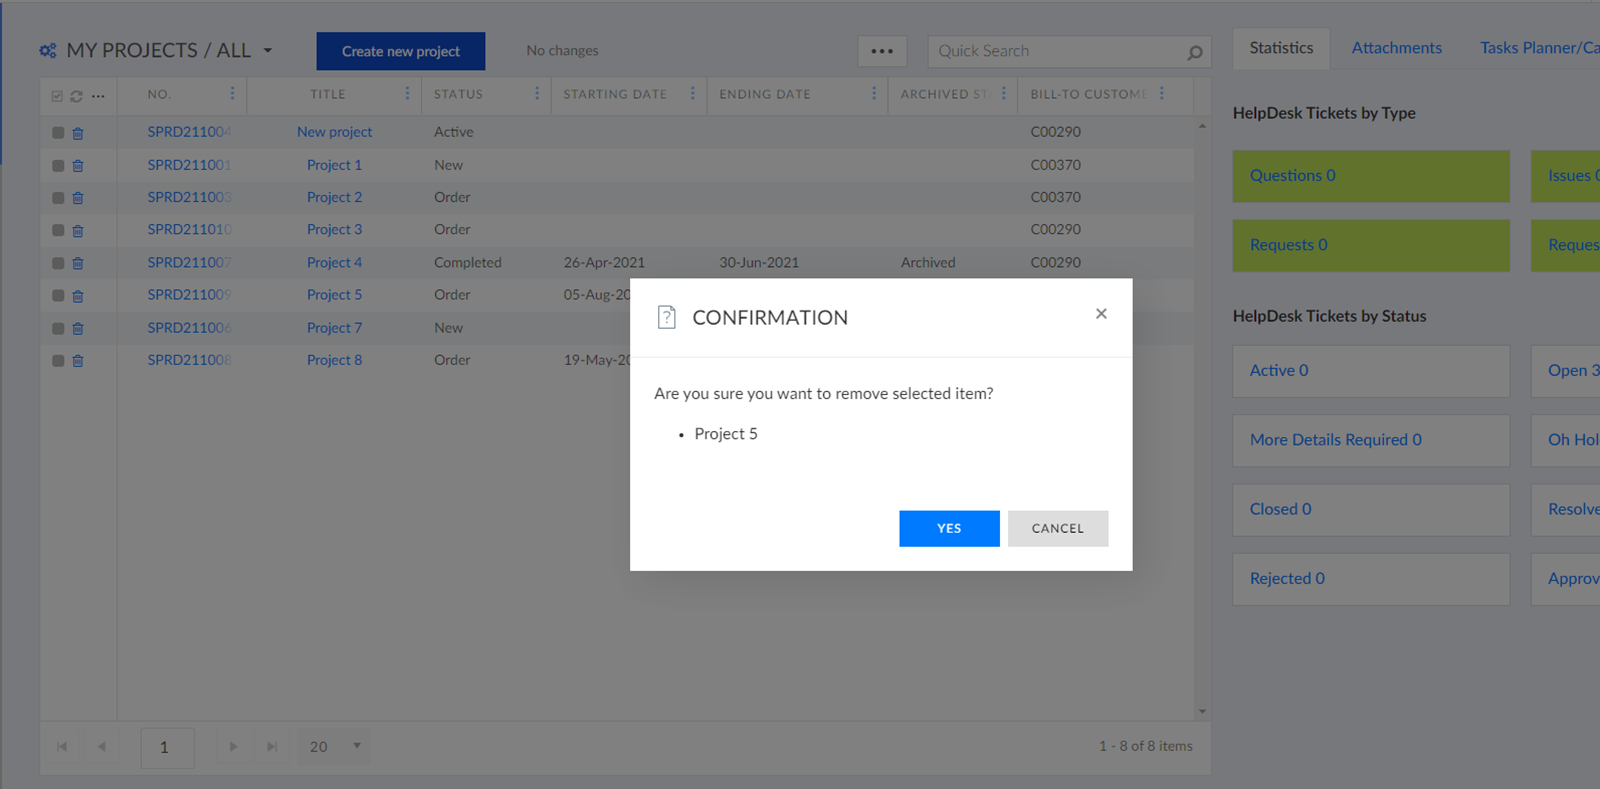
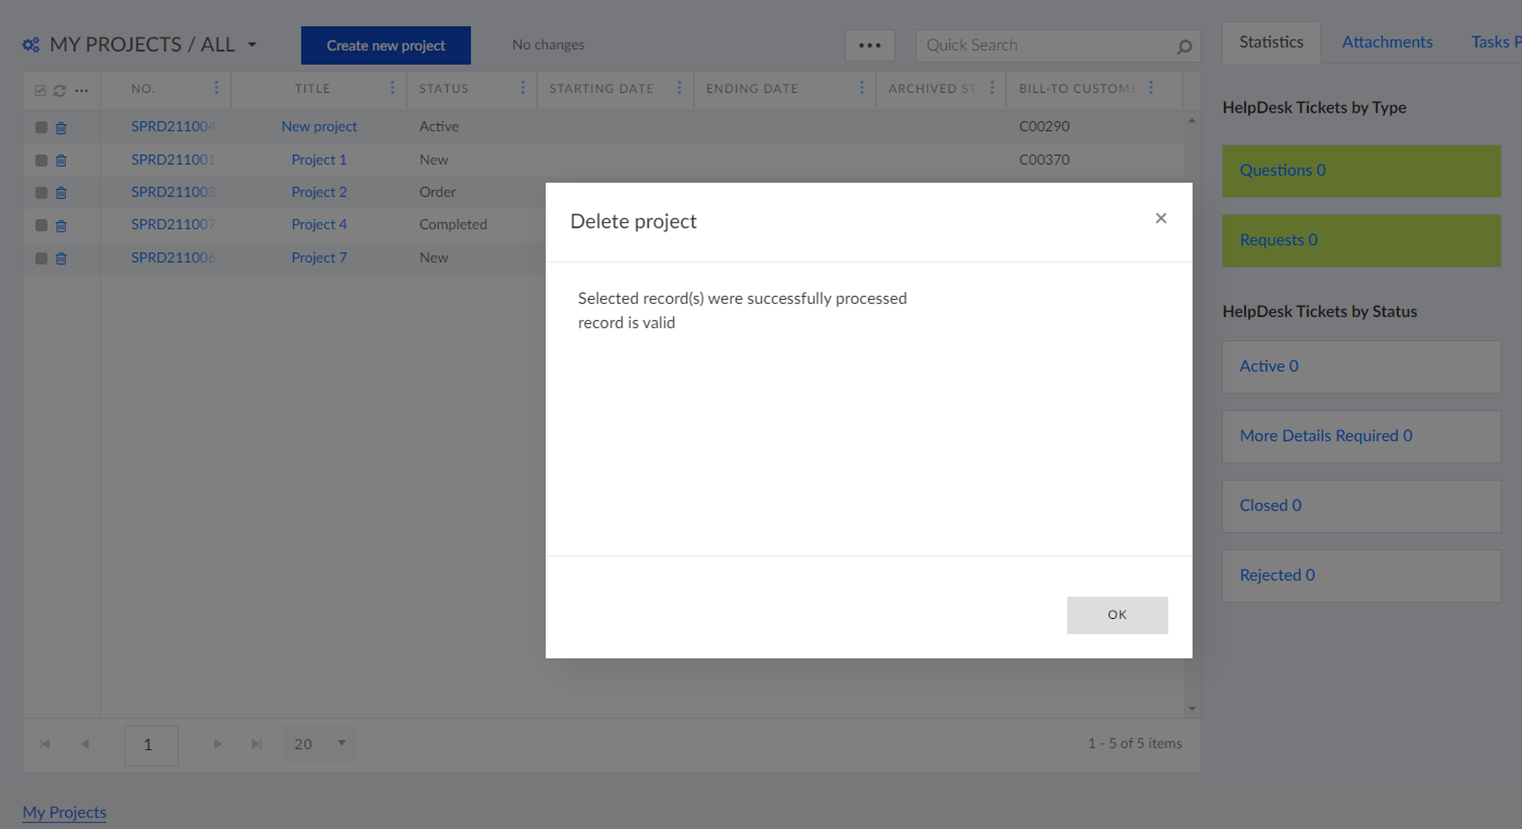
Complex delete toolbar command provides the ability to
delete a parent record and related records at the same time on the basis of
configured validation filters.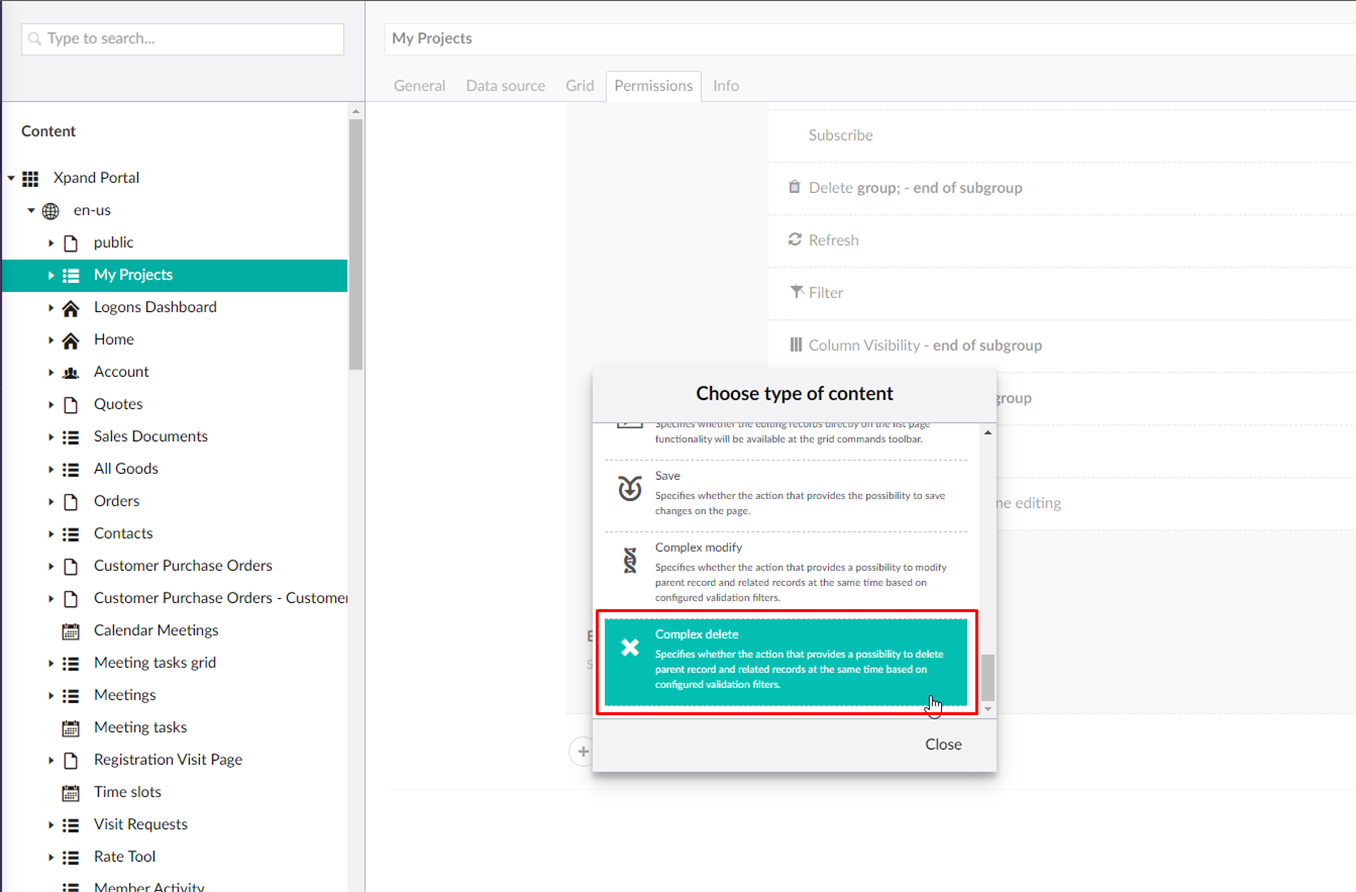
Complex delete setup:
Front end look:

New icon pack “Flat icons” (US4146)
The library of built-in icon packs, which can be used to assign icons where possible, was expanded with a new pack called “Flat icons”.
New properties – Copy, Paste for data (T4505)
New properties were added to the setup:

New settings for labels, legend, and axes in charts (B4634)
New settings were added to the setup of charts:
Show Labels/Notes - this setting allows you to choose whether chart labels/notes will be displayed.
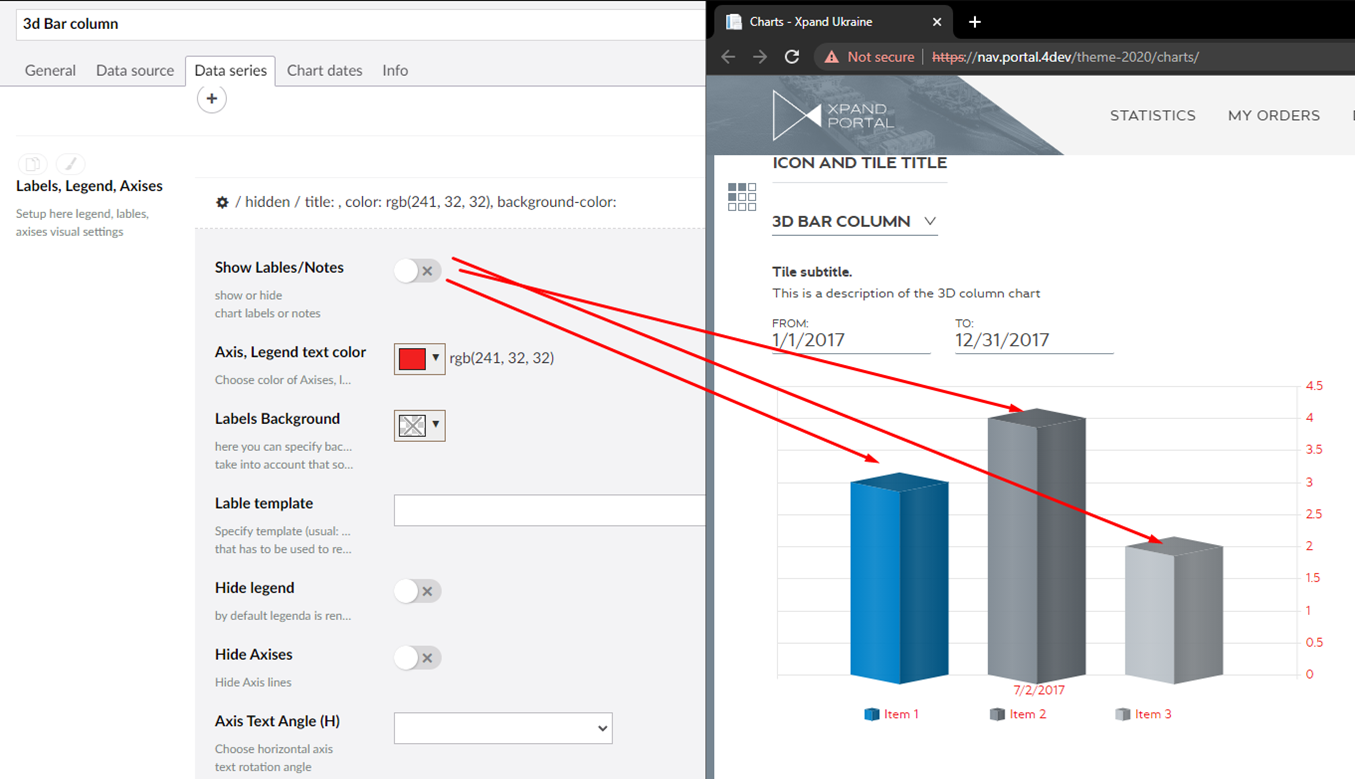
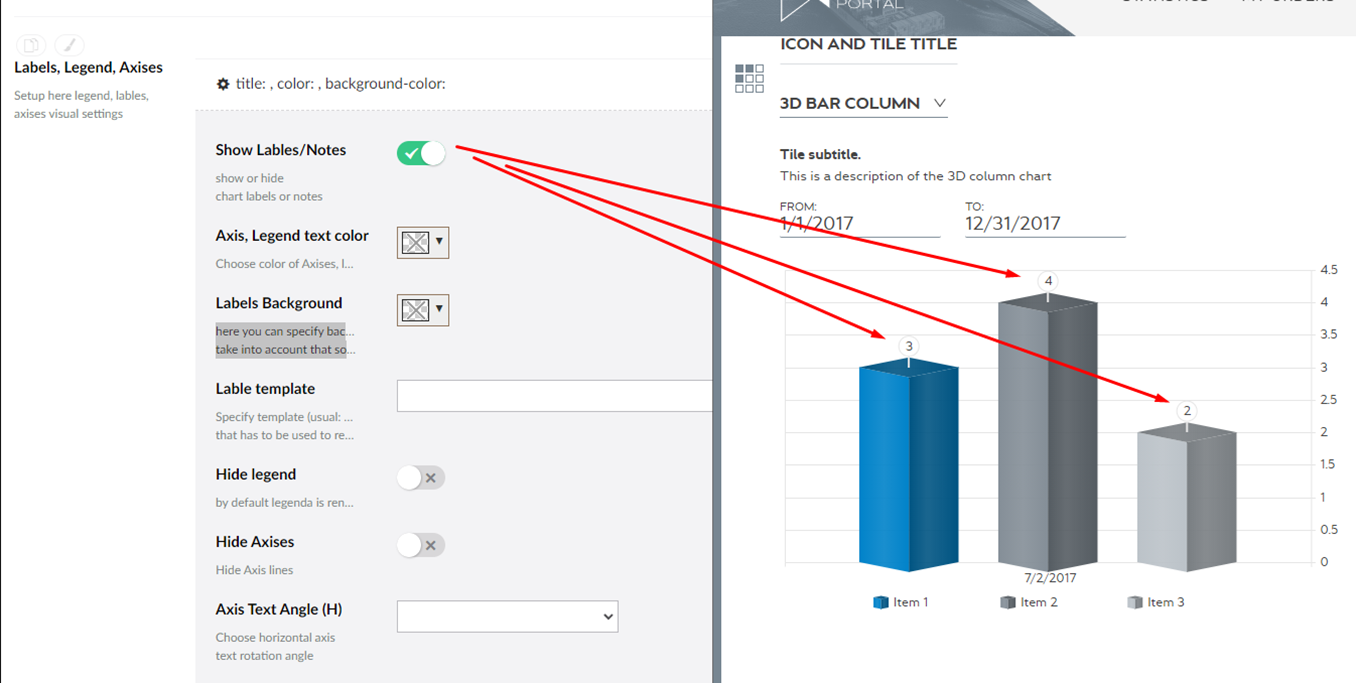
Labels are shown as squares on Area, Line, Pie, Stacked Line, and Sunburst charts for now.
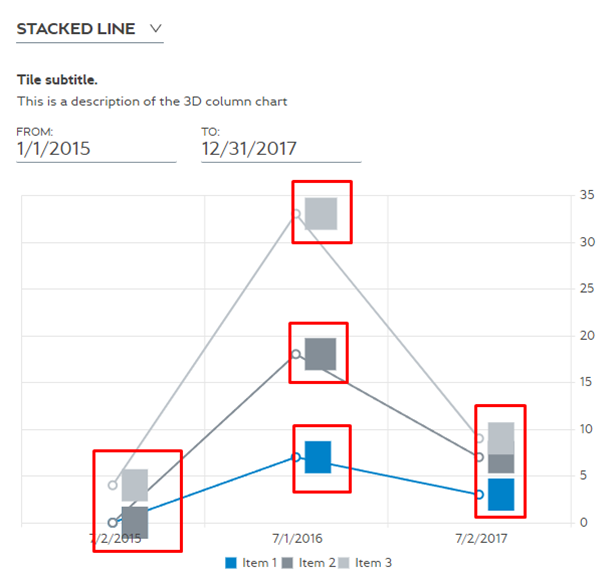
Note that the Area, Line, Pie, Stacked Line, and Sunburst charts don't support markers. Only squares are possible to show there. However, this will be improved in one of our future releases (by developing own visualization).
That is why we recommend hiding labels for these types of charts for now.
Axis, Legend text color – This setting allows you to
choose the color of text in axis and legend as well as notes.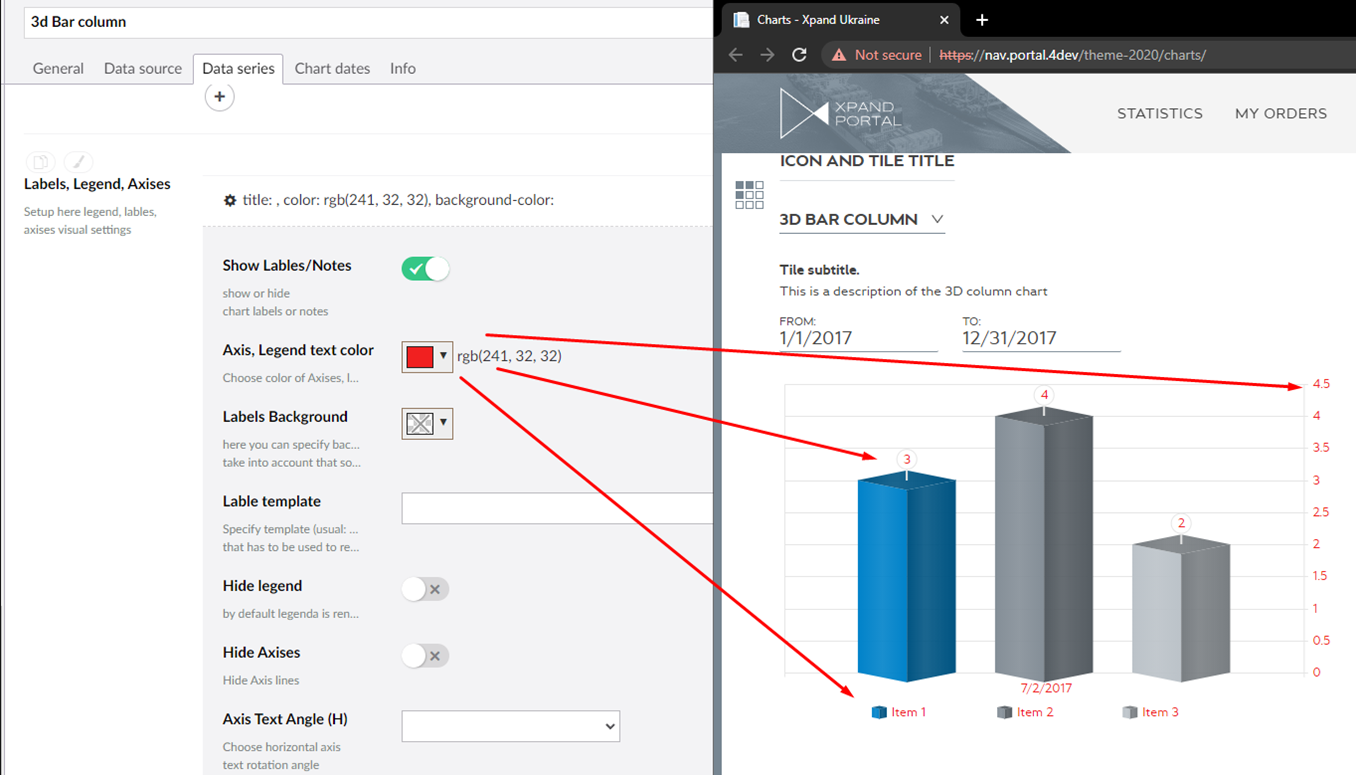
Labels Background – This setting allows you to specify
the background color for labels or notes (take into account that some types of
charts (Area, Line, Pie, Stacked Line, and Sunburst)
do not support that for now – it is under development).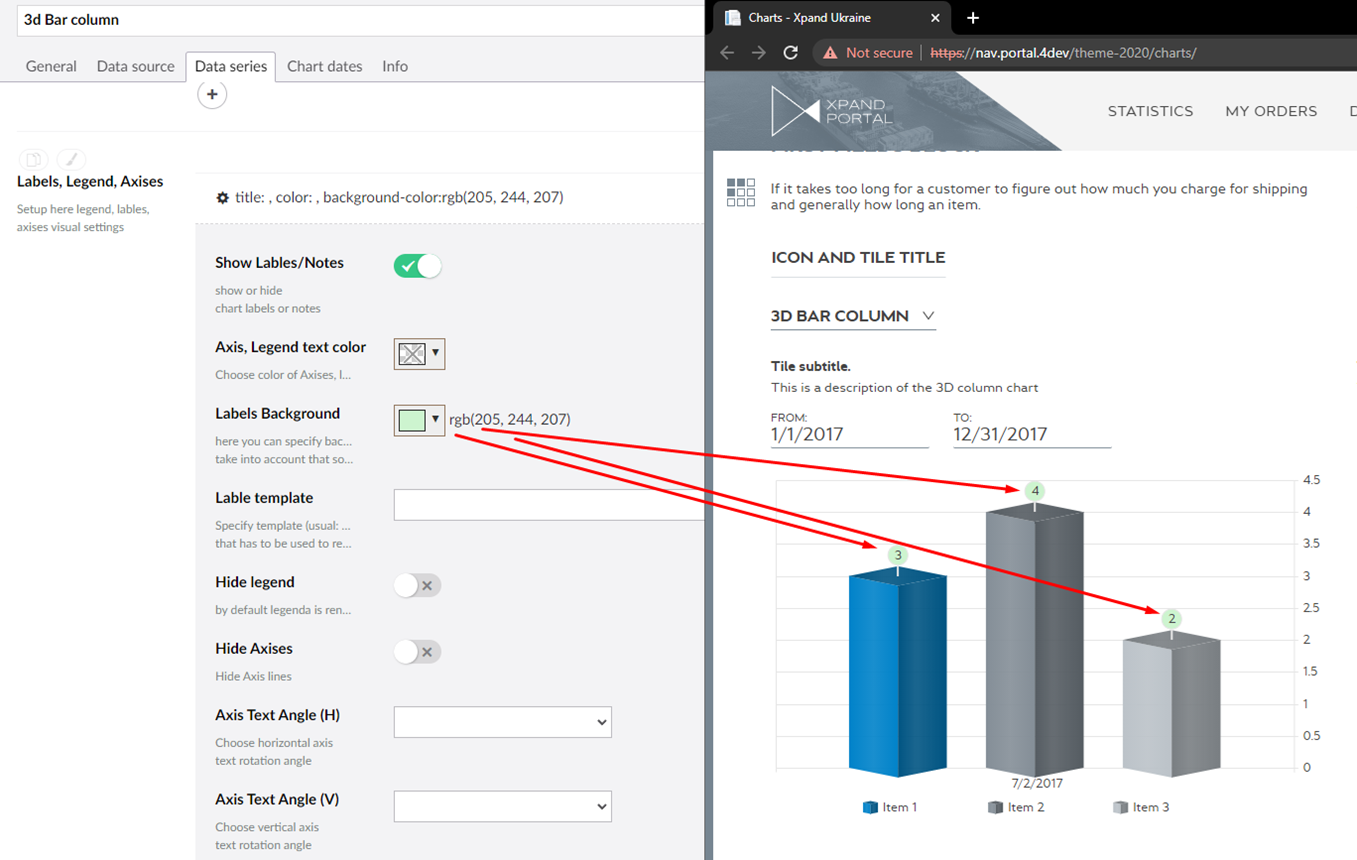

Hide Axes - This setting allows you to hide the chart vertical axis. By default, the axis is shown.
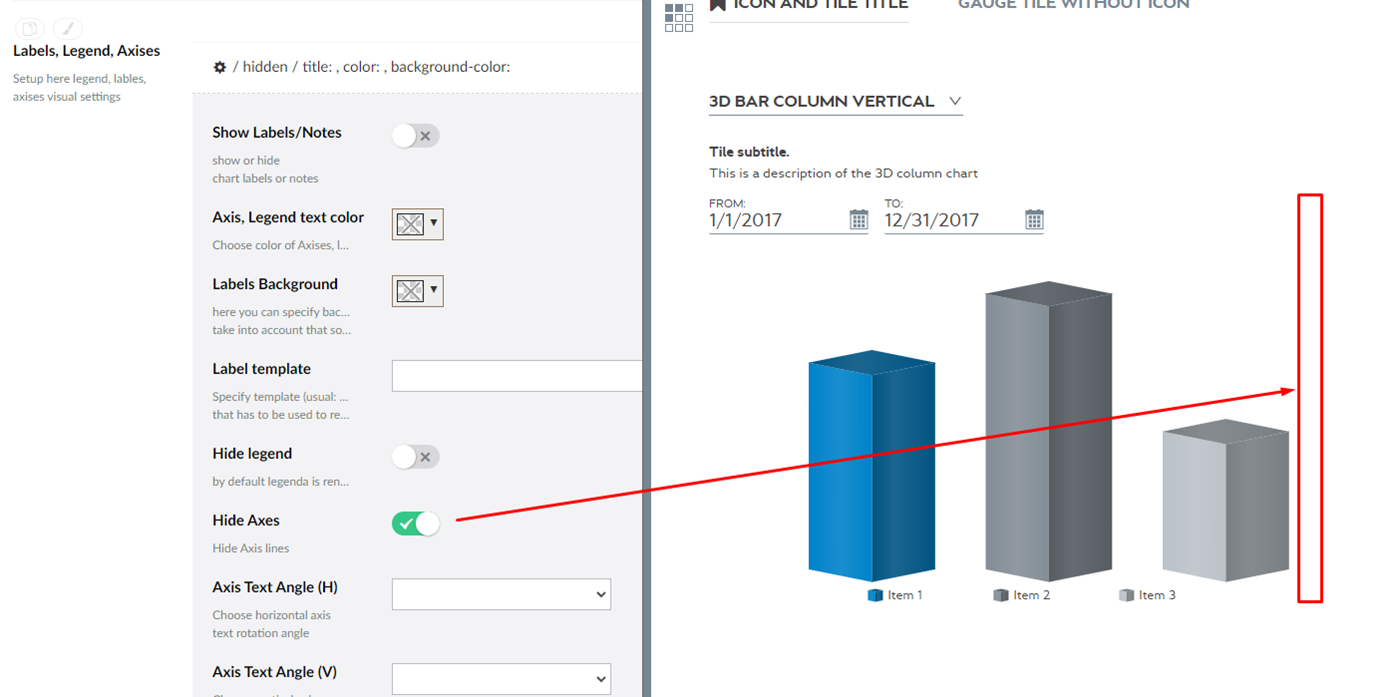
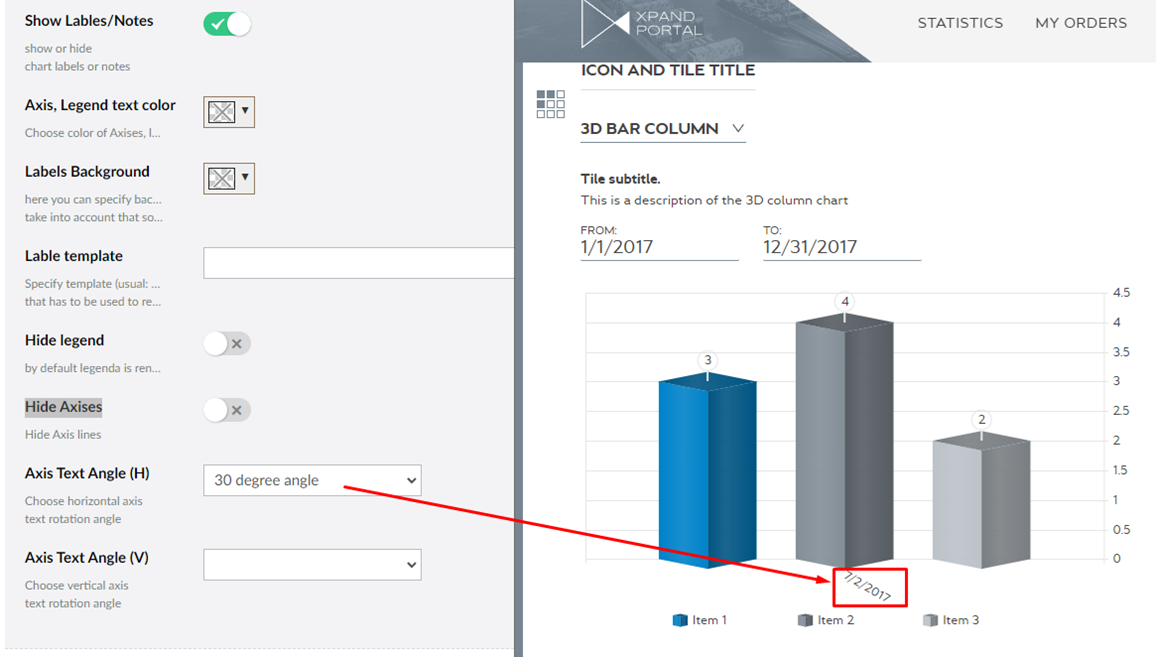
Axis Text Angle (H) – Specifies the angle the
horizontal axis text will be shown at.
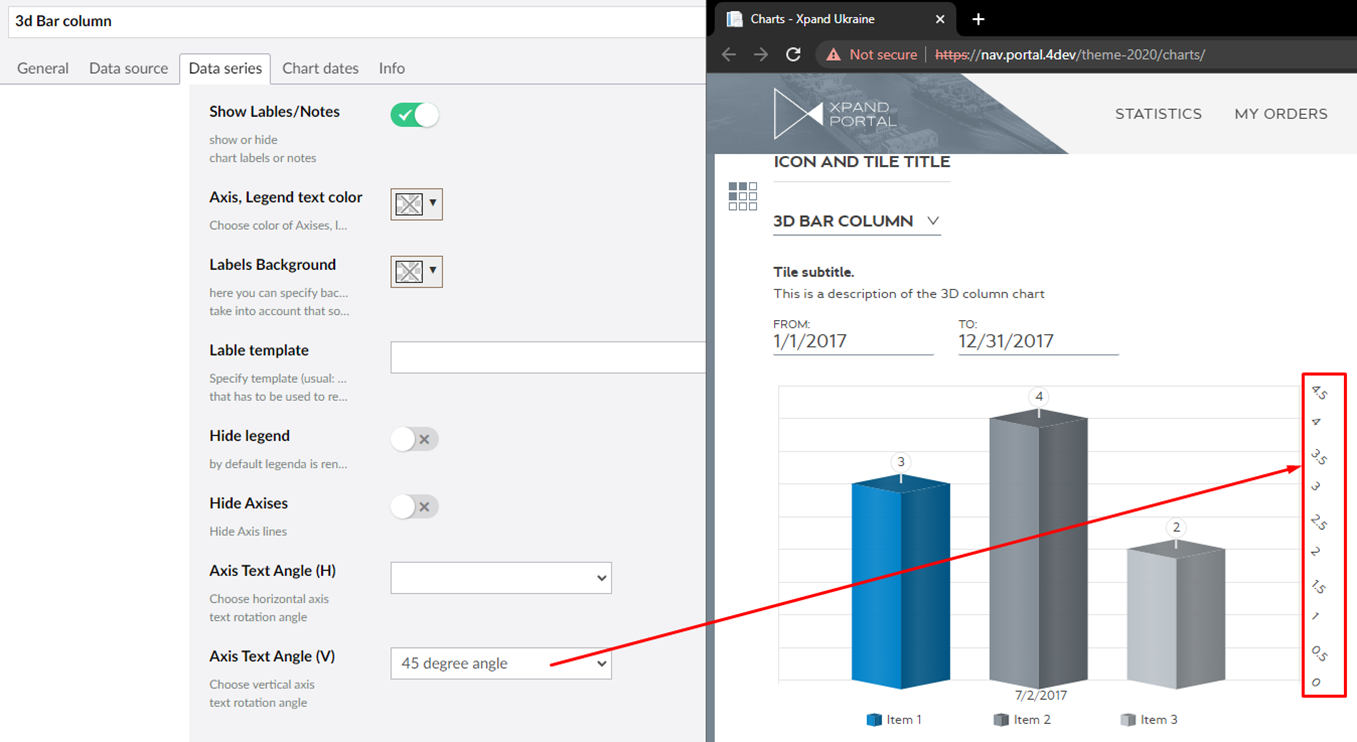
Axis Text Angle (V) - Specifies the angle the
vertical axis text will be shown at.
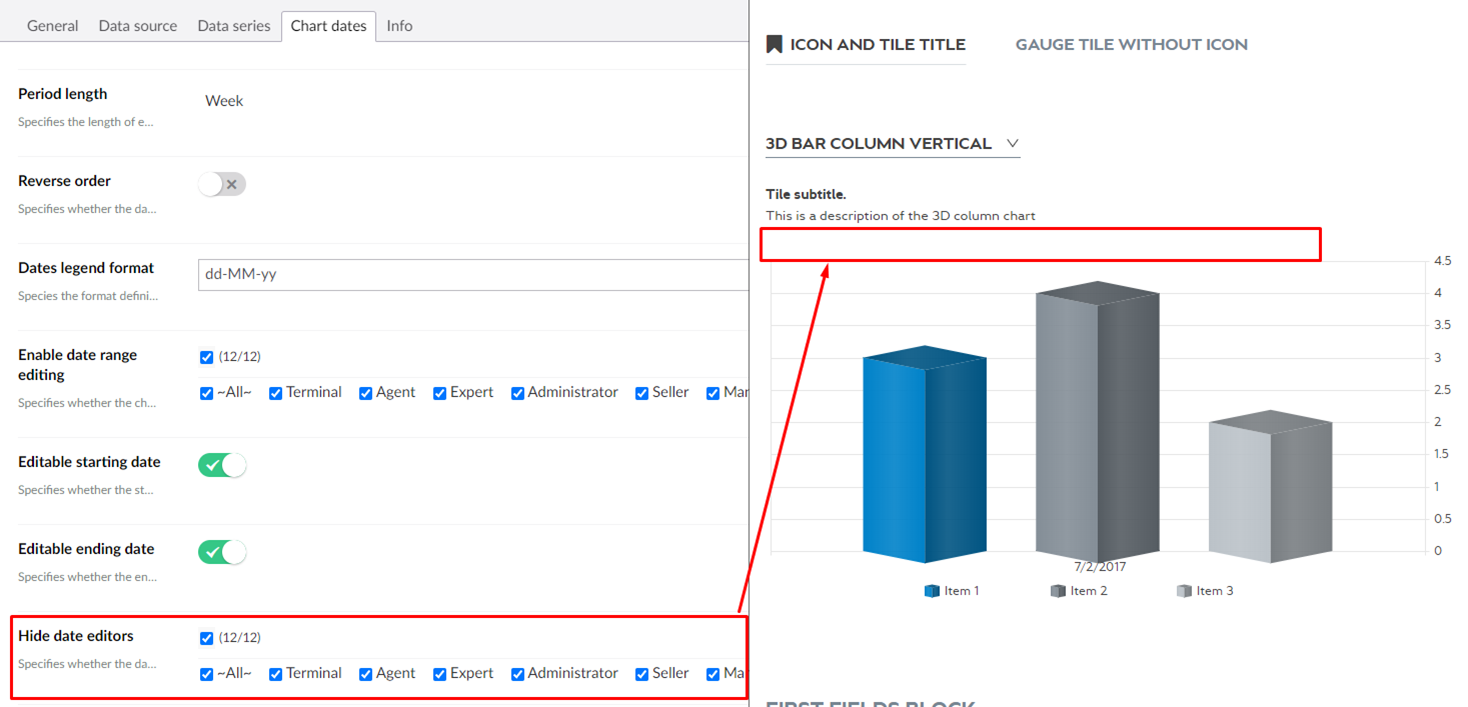
New settings to set up font color on tiles, gauges, and charts (T4288)
New settings for font color configuration were added to the setup of tiles, gauges, and charts
Tiles:
Font color – Specifies the font color that will be applied to text on tiles.

Gauges:
Header font color – Specifies the color that will be applied to the gauge header text.
Counter color – Specifies the color that will be applied
to the gauge counter and gauge body text.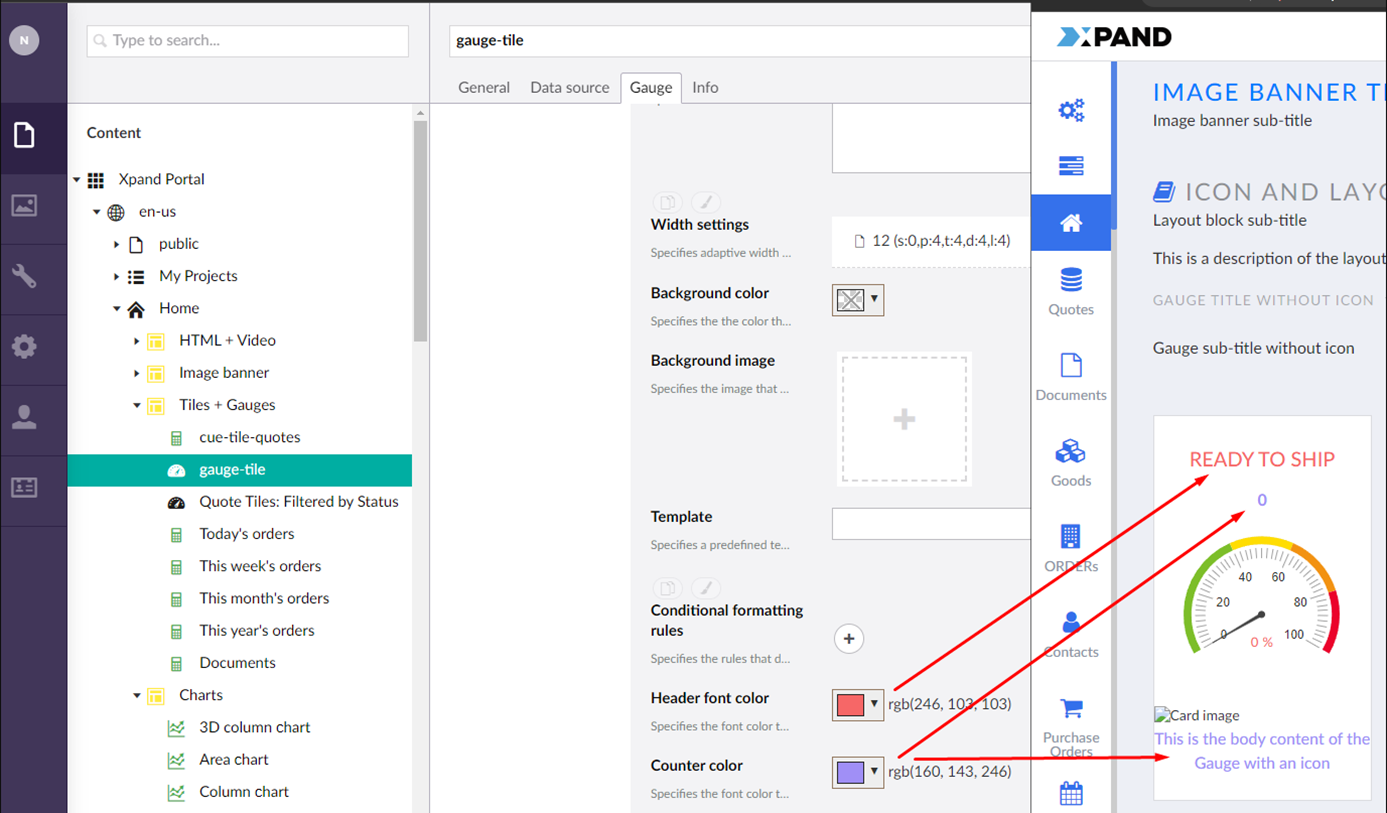
Charts:
Font color – specifies the font color that will be applied to the chart text.
| Note: It is applied only when it is possible to do so: for now, only in labels and not in all charts (Area, Line, Pie, Stacked Line, and Sunburst). Own rendering of labels for all charts will be possible in the future. In conditional formatting for charts and bars, font color can't be applied to the legend, which always uses the basic chart color. |

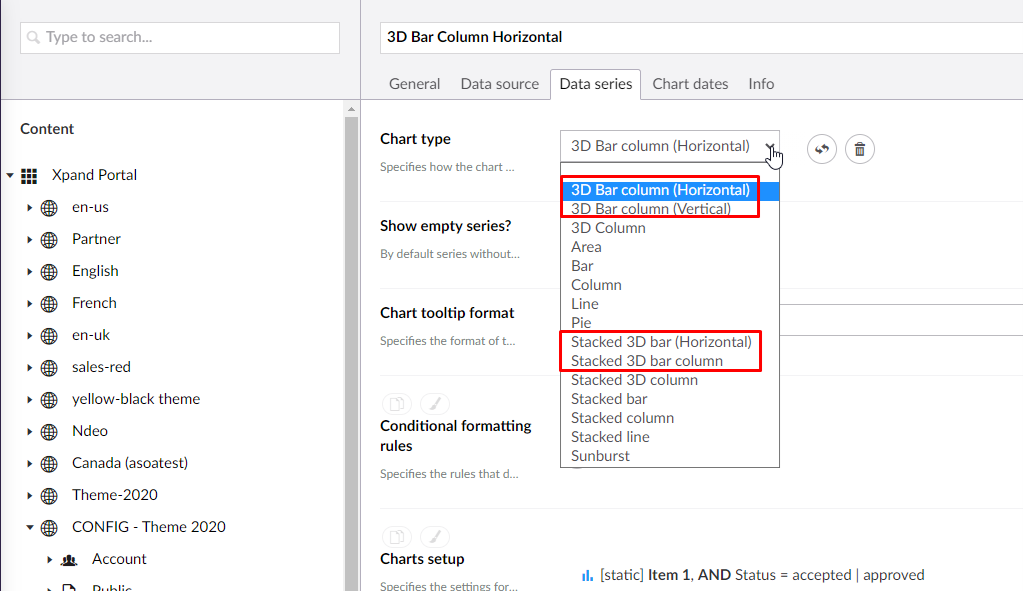
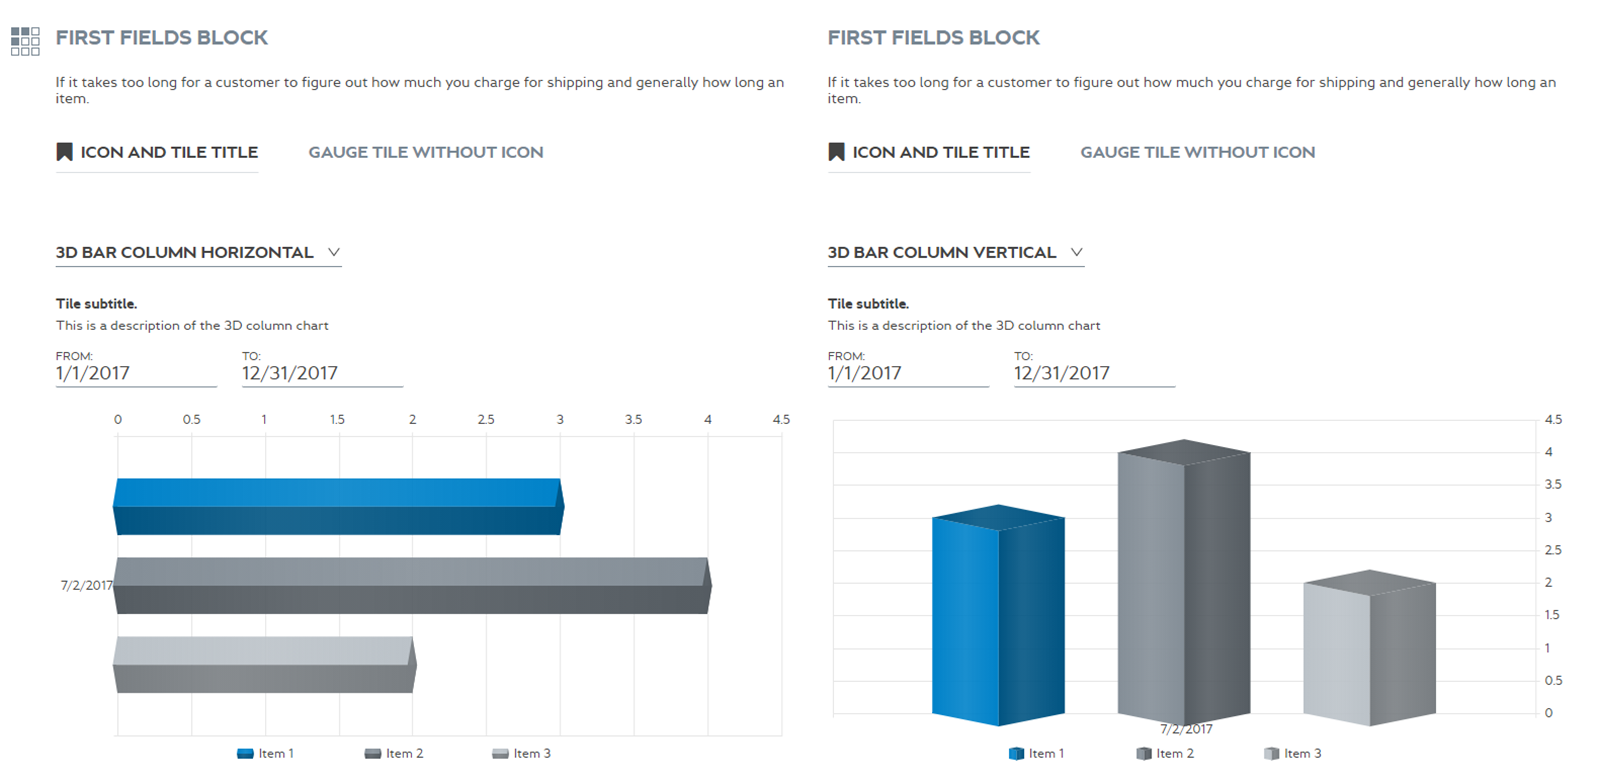
New 3D charts are available for use.

Connector updates
New settings on Portal Integration Setup
To be able to work with Xpand Portal Connector, the administrator needs to enable and configure the connection with the portal.
To enable and configure the connection to the portal some new settings were added:
- The Client ID field, type the BC-Client. It’s the name of the client that is used to connect to Xpand Portal API.
- In the Client Secret field, type the secret abcABC123! of the BC-Client client ID.
- Notifications
Portal Connection Setup will look as shown in the screenshot below.
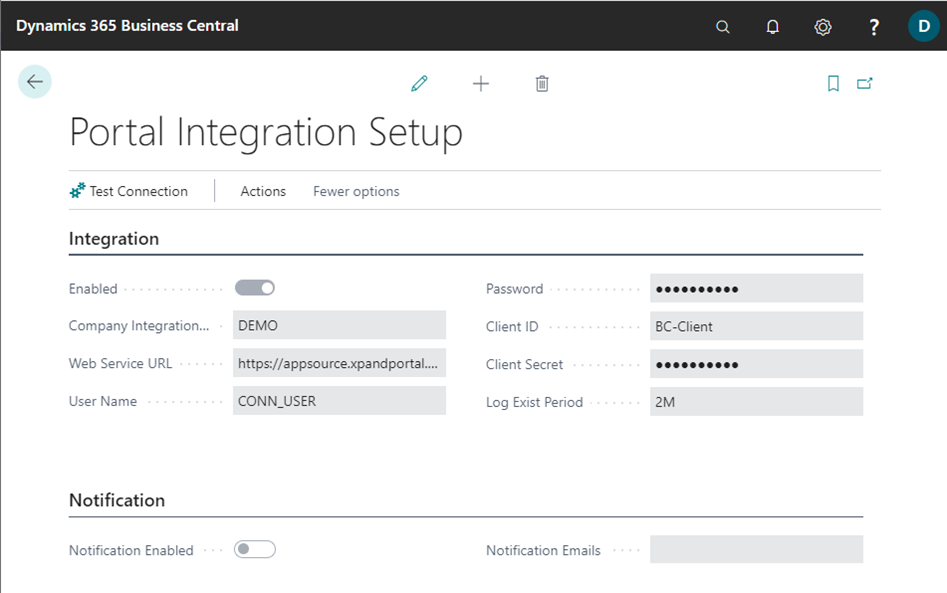
Note: Client ID and Client Secret are added to use additional authentication for portal connection. In Media-> SSO and Auth settings, the client is created, and its ID and secret (password) are filled in here in the connector, then the portal checks this access and allows to send data to / from the portal through the connector. This was done to add even more security to connection between the ERP and the portal, so that only authorized clients have access to data transferring and receiving.
Notifications are used to notify a person that the portal job queue does not work, and the data is not synchronized. A notification is sent to the specified email. You can specify many emails through a comma. |
Export Entity Structure
to Xpand Portal
The portal administrator needs to manually export some entity field to Xpand Portal without updating data.
To export structure:
- Choose the
 icon, enter Portal Entities, and then choose the related link.
 - In the Portal Entities window, select the portal entity Contacts, choose Manage, and then choose View.
- In the Portal Entity Card window, choose Export, and then choose Export Entity Structure.
- In the Export Entity Structure to Portal window, choose OK.
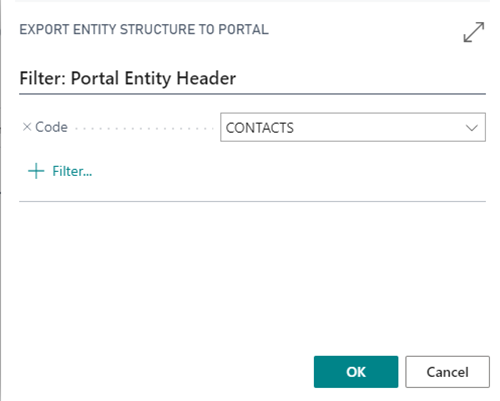
After the process of update entity structure on portal is completed, a success message is shown.
Import Data from XML
Preconditions:
- There is an XML data from a 3rd party storage that needs to be imported to the Contacts entity on Business Central.
The portal administrator needs to manually import some data from XML.
To import data:
- Choose the
 icon, enter Portal Entities, and then choose the related link.
 - In the Portal Entities window, select the portal entity Contacts, choose Manage, and then choose View.
- In the Portal Entity Card window, choose Import, and then choose Import Entity from XML.
- In the Import XML window, click Choose and select the import file with a needed data.

When the process of import is completed, a message is shown.

Bug Fixes
Various issues have been fixed throughout Xpand Portal.
A detailed description of these features is available or will be added soon to our help center.
Contact us to request a demo:
Phone: +380 44 251 36 36
Email: info@xpandsoftware.com


